Getting tape placement just right can make or break a lash extension session. If you’re wondering how to do it without discomfort or messing up your work, you’re not alone. Proper taping keeps the area clean and helps isolate the lashes for a flawless extension.
By the end of this, you’ll know how to prep the skin and apply tape securely and comfortably. Keep reading to learn the full technique so your lash extensions turn out perfect every time.
Why Proper Taping Prevents Damage and Improves Retention
Proper taping prevents damage and enhances retention by creating a protective barrier during lash application. It shields your lower lashes from sticking to the upper lashes, reducing the risk of accidental pulling or breakage. Taping also minimizes adhesive contact with delicate under-eye skin, lowering irritation and inflammation. By supporting lash isolation, taping helps prevent clumping and ensures that each extension bonds to a single natural lash, which improves durability and long-term retention. Additionally, taping shifts outer corner lashes for better access, making it easier to work in that challenging area. This technique is similar to how derma rollers create micro-channels to enhance product absorption. Just as derma roller use requires adequate recovery time between sessions to avoid overstimulating the skin, taping must be adjusted based on client sensitivity to prevent over-tension. To achieve the best results, always use medical-grade adhesive tape specifically designed for lash applications. Additionally, taping stabilizes lash placement, making it easier to apply extensions precisely. It speeds up the process by providing clear access to inner and outer corners, reducing lashing time. Well-placed tape minimizes eyelid strain and twitching, making longer sessions more comfortable for both you and your client. Overall, proper taping enhances the quality of your work, protects your client’s eye health, and results in neater, longer-lasting lashes.

6 Rolls Eyelash Tape: Each roll of medical tape is 0.5" / 1.2cm wide, and one roll is 9.84 yards / 9m long, 6 rolls total 59 yards long and each one is the individual package, clean and hygienic. Provides long-term convenience without the need for frequent restocking

Quantity: 6 rolls, 1.2 cm in width, each roll approx 9 m in length, enough to meet your needs

Upgrade Medical Materials: This waterproof and breathable medical tape for eyelash extensions is easy to remove and leaves no adhesive residue upon removal, tape gentle enough not to damage the stratum corneum, it will not hurt your skin when removeing.
Prep the Eye Area for Lash Extension Taping
To prepare the eye area for lash extension taping, start by thoroughly cleansing the area to remove makeup, oil, and debris. Focus on the lash line and roots using a gentle cleanser and a lint-free applicator. Proper makeup removal prevents residue from blocking tape adhesion and reduces skin irritation. Ensure you rinse completely to eliminate any foam or leftover product. After cleansing, dry the eye area thoroughly—moisture control is essential because damp skin decreases tape grip and can cause slipping. Use a lint-free swab to gently pat the lashes and eyelids dry, making sure no dampness remains. Position your client’s head with a slight tilt to one side, eyes closed, to control runoff during cleaning. This step creates a clean, dry surface, which directly enhances tape performance and improves client comfort before proceeding. Ensure the client’s hair is pulled back and secured with a stocking cap to keep stray hairs and oil away from the lash line. Proper tape placement requires dividing white tape into larger pieces and folding to create a clearer background for secure application. Understanding the chemical composition of adhesives can help you select a tape that minimizes allergic reactions and maximizes hold. Pressing firmly along the tape for several seconds ensures a strong bond without gaps.
Choose the Right Tape for Lash Extensions
Choosing the right tape for lash extensions is crucial because it impacts both your client’s comfort and the durability of your work. Prioritize medical-grade, hypoallergenic tapes to minimize the risk of irritation, especially for clients with sensitive skin.
Tape texture is a key factor—softer adhesives are gentler on delicate eyelids, reducing discomfort during application. Breathable foam tapes help prevent sweating and irritation during long sessions, making the process more comfortable. For clients with latex sensitivities, using a latex-free option like purple microfoam or flexible waterproof tape is essential to avoid allergic reactions. When selecting adhesives, consulting detailed tape reviews can help you compare hold strength and removal ease. Always verify that your chosen tape is suitable for beginner-friendly use to avoid unnecessary waste while you refine your technique.
Color also matters; clear or translucent tapes avoid creating shadows that can distract from the lash line, allowing better visibility for precise placement. Match the tape to the eye shape: deep-set eyes benefit from medical lash tape, which offers a secure hold without excessive pressure, while round eyes may do well with sensitive-skin rolls that are gentler but still sticky enough to hold lash extensions securely. Before applying any tape, ensure your hands and tools are sanitized, as proper cleaning methods reduce the risk of transferring bacteria to the client’s eye area.
Strong hold qualities are important to keep lashes in place, but easy removal is equally vital to protect the skin and prevent damage during tape removal. Precut tape strips save time and ensure consistency across applications, especially when working with multiple clients or when speed is essential. Remember, there is no universal solution—pick the tape based on your client’s sensitivity, skin type, and hold requirements to achieve the best, irritation-free results.
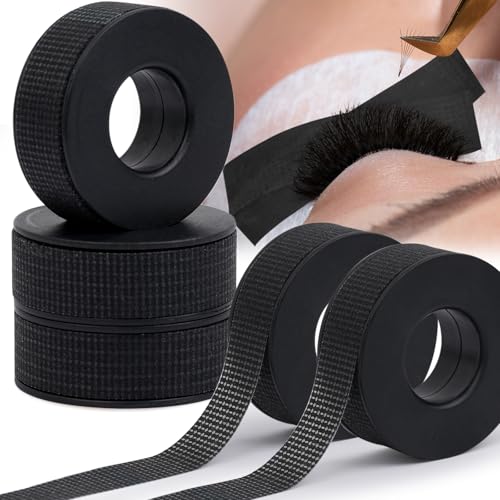
Breathable and Soft: Micro porous silicone gel tape has high breathability and soft touch, fitting the skin perfectly, waterproof and securely.

SILICONE TAPE MEDICAL FOR SENSITIVE SKIN: Made with premium hypoallergenic silicone, this medical tape sensitive skin solution is designed to reduce irritation while providing secure adhesion; ideal skin tape for everyday use, wound care, and delicate areas

SILICONE TAPE MEDICAL FOR SENSITIVE SKIN: Made with premium hypoallergenic silicone, this medical tape sensitive skin solution is designed to reduce irritation while providing secure adhesion; ideal skin tape for everyday use, wound care, and delicate areas
Lift the Eyelid With Tape for a Clearer View
Lifting the eyelid with tape provides a clearer view of the lash roots and enhances access without causing discomfort. To achieve this, start with proper eyelid positioning. First, thoroughly clean the eyelid using an oil-free cleanser to eliminate makeup, powders, or excess oil, then allow it to dry completely. This step ensures the tape adheres properly and doesn’t slip during application. For best results, ensure the skin is free of residue just as you would when preparing the scalp for a wig cap. Unlike tattoo machines, which require careful selection between rotary and coil types based on cost and wear time, this tape method focuses solely on temporary eye lift. However, just as consistent use of red light masks can improve skin texture over time, proper tape technique ensures reliable results with each application.
For tape placement, position the strip just above the lash line. Gently pull the eyelid upward with a light, controlled tension to slightly lift the lid, exposing the lash base. Avoid pulling too hard, as excessive tension can cause discomfort or damage. For challenging areas, such as the inner or outer corners, use small strips to lift these regions separately. If a single strip isn’t sufficient, crossing two strips in an X-shape can provide a wider, more effective lift. Proper eyelid positioning is essential for optimal tape adhesion. The main goal is a temporary eye lift that improves visibility for shield placement while maintaining the eye in a closed, comfortable position for the client.

【Seamless with your makeup】This eyelid tape is made with 0.03mm ultra-thin PU film plus a micro-matte (skin-friendly mist) finish, helping reduce glare under bright light while blending more naturally with foundation and eyeshadow for a soft, skin-like feel.

【Instant Eye-Opening Effect】Create a more refreshed and defined eye look in seconds. Designed to lift and support excess eyelid folds, helping enhance the appearance of monolids, hooded eyes, uneven creases, and heavy-looking eyelids.

Our eyelid lifters are very sticky, holding the eyelid in place perfectly, non-reflective. They make your eyes look bigger, younger and more energetic, and make your makeup more natural.
Tape the Lower Lashes Step by Step for Secure Isolation
To tape the lower lashes securely and ensure effective isolation, follow these precise steps. First, place an under-eye pad beneath the lashes to support and protect the delicate skin. Next, apply micropore tape in an X or V shape—these patterns allow the lash line to be exposed while keeping the lashes flat and organized. Be careful to avoid taping too close to the waterline or mucous membrane, as this can cause discomfort or lift the lashes prematurely. Keep the tape positioned away from the surface of the eye to prevent irritation. Proper tape adhesion depends on the surface being clean and dry, much like how a stable carrier ensures consistent pigment flow during ink production. For additional guidance, refer to the tape-in method used in hair extensions for similar isolation techniques. Always ensure the under-eye pad fully covers the lower lashes to prevent accidental adhesive contact during application.
Using straight tweezers, gently isolate each lower lash by pulling it outward, creating a clear separation from its neighbors. Confirm that the tape is holding firmly but not so tight that it causes discomfort or slips out. Recheck the alignment at both the inner and outer corners of the eye to ensure complete coverage. Proper tape application and lash isolation prevent clumping during the adhesive process and allow for a clean, precise eyelash extension attachment. Remember, lash tips should be angled downward toward the skin for optimal results. Pre-cutting tape into irregular pieces saves time and streamlines the application process.
Place Tape Comfortably to Avoid Eye Irritation
After securely taping the lower lashes, the next priority is placing the tape comfortably to prevent eye irritation. Start with clean, dry skin around the eye area; oil-free skin helps ensure the tape stays in place. Position the tape at least 2 to 3 millimeters below the waterline. Placing it higher risks contact with the eyeball, which can cause discomfort. Trim the tape to about 1.5 inches in length and shape the edges to match the client’s eye shape for better fit. Begin by applying the tape from the outer corner first, then gently handle the inner corner with extra care. Ask your client to close their eyes and check if the tape feels comfortable. If they report pinching or poking, shift the tape downward slightly. Regular comfort checks during the process are essential to avoid irritation. Using a sterilized derma roller on the brow area can help improve product absorption, but it should never be used near the eyes. Additionally, use vertical tape placement on the eyelid to pull upward for improved lash line access, which simplifies isolation and enhances overall application efficiency. Since the skin around the eyes is highly sensitive, always prioritize using hypoallergenic adhesives to minimize any risk of an allergic reaction or chemical irritation. For any adhesive that gets on the skin, gentle adhesive removal techniques help prevent further irritation around the eye area.
Remove Tape Gently After Lash Extensions
To remove lash extension tape safely, you must loosen the adhesive first. Applying an alcohol-based remover along the tape’s edge allows it to seep in and break down the bond. This step is crucial because pulling the tape dry risks damaging your natural lashes or the extensions themselves. Wait a moment after applying the remover, then gently test the tape for loosening. If it resists, add more remover and wait again — patience is key. Proper maintenance significantly impacts extension longevity and hair health. Always work in a well-lit area to see the adhesive bond clearly before proceeding. Be aware that prolonged adhesive exposure can irritate skin, similar to risks associated with some skincare devices.
Once the tape begins releasing, lift it slowly and section by section. Use a tool or your finger to guide it apart without tugging, ensuring minimal stress on your natural lashes. After removal, clean any remaining residue with an oil-based remover that dissolves leftover adhesive. Finish by gently brushing your lashes and cleansing the area to maintain healthy, undisturbed lashes. The best approach is to loosen, test, repeat if necessary, and clean, thereby safeguarding both your natural lashes and the extensions. For stubborn spots, allow the remover to seep longer before attempting another lift.